


A: Install laser tube
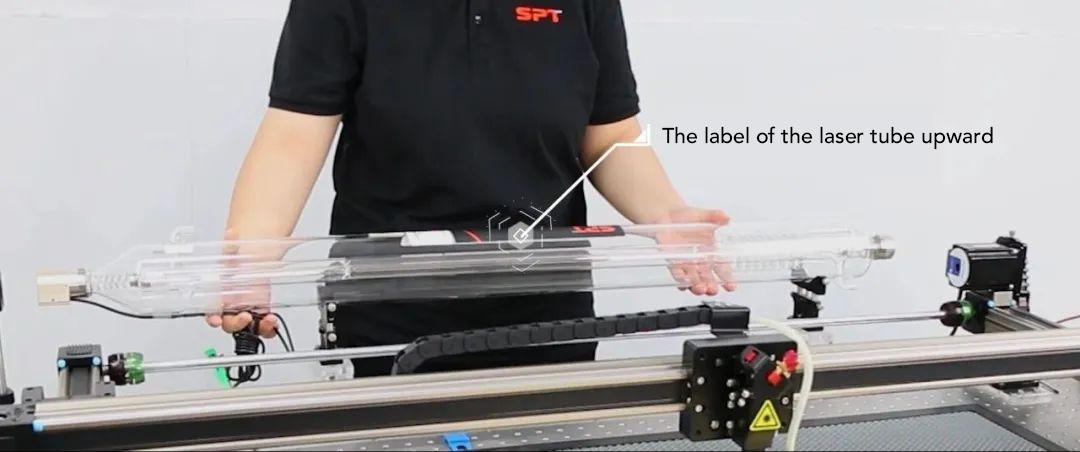
1. Supporting point Support points must be accurate. Place the laser tube according to the support label attached to the laser tube by the manufacturer.
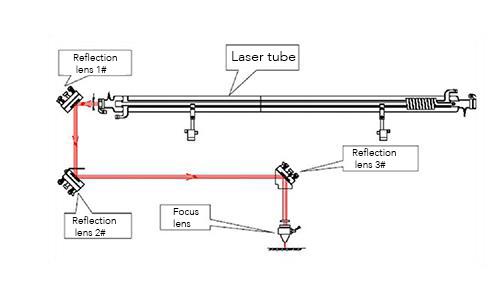
2. Direction of the water outlet. The laser tube negative electrode (laser output end) is the water outlet. Please refer to Figure 1.
3. Water cooling. Before starting the laser tube must store enough water in the water cooling pipes and no air bubbles. Please ensure that no air bubbles at the top of the laser tube and water cooling pipe is filled with water. It will cause thermal shock when it runs with air bubbles in the water pipe, which is easy to damage your laser tube.
B: Clean laser lens
1. Check if any scratches or dirt on 3 mirrors. If there is any pollutant, please use a medical cotton swab to pick up the alcohol with a purity of more than 99% to wipe the surface of the mirrors gently and remove contaminated attachments, and then dry the mirrors with a dry cotton swab. If the surface of the mirrors are scratched or burned out, please replace the mirrors in time.
2. Take out the lens regularly clean the surface (dependng on use situation and work environment to determine the maintenance interval), The clean method is the same as mirrors, but please note that lens have 2 sides to clean.
C: Adjust the light path to ensure the correct path
When adjusting the optical path, first adjust each mirror to a position that is approximately perpendicular to the horizontal plane and maintain a 45° angle with the X direction. At this time, the lengths of the three adjustment screws between the mirror frame and the frame fixing plate are substantially the same.
The first step: Adjust the 1st mirror, ensure that the beam from the laser tube is incident on the center of the 1st mirror.
The second step: Adjust the 2nd mirror, attach the double-sided adhesive tape (or other object that can be marked) to the optical path adjustment auxiliary frame of 2nd mirror, move the beam to the position closest to the laser tube, and press the click button (control the appropriate power intensity) to make a laser mark on the adhesive tape (Note: To prevent laser radiation from injuring people, please use a piece of cardboard to test the approximate position of the spot before making adjustments).
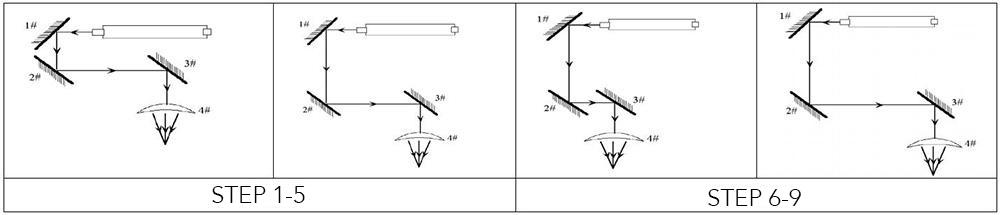
The third step: Gradually move the beam to the farthest position from the laser tube, press the click botton to make a mark on the adhesive tape of the 2md mirror.
The fourth step:If the two marks do not coincide, adjust the 1st mirror so that the two mark centers on the 2nd mirror tape coincide.
The fifth step: Repeat step 2 to setp 4 until the two marks on center are completely coincident.
The sixth step: Attach double-sided adhesive tape (or other object that can be marked) in front of the 3rd mirror, move the car (laser head) to the position closest to the 2rd mirror, and press the click button (control the appropriate power intensity) to make a mark at 3rd mirror.
The seventh step: Move the car (laser head) to the farthest position from the 2rd mirror, and press the click button ( in case of any injury, use a piece of cardboard to measure the approximate location of the laser spot) to make a mark on the adhesive tape of the 3rd mirror.
The eighth step: If the two marks on the 3rd mirror tape do not coincide, adjust the 2rd mirror so that the center of the two marks coincide.
The ninth step: Repeat steps 6 to 8 until the two marker centers are completely coincident.
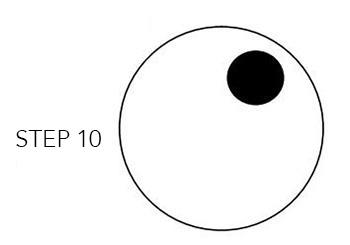
The tenth step: Place a double-sided adhesive tape on the light entrance of the focusing lens under the 3rd mirror, and press the click botton to mark on the adhesive tape. If the mark is at the center of the adhesive tape, the light path adjustment is completed
The eleventh: If the laser does not fall in the center of the light entrance, as shown below, adjust the following steps as below shown until the laser spot mark falls at the center of the double-sided adhesive tape at the light exit.
Up and down deviation: Only raise or lower the laser tube.
Inwards and outwards deviation: only adjust the laser tube in or out
In this case, laser spot is above and out. It is therefore necessary to lower the laser tube and then re-adjust it from the first step.


